


In this article you will learn how to make a simple stop watch using JavaScript. Stopwatch is a simple JavaScript project that is important enough for beginners.
This type of project is used to count some time. The most important point of this design is that here you can count milliseconds i.e. hours, minutes, seconds and milliseconds.
Watch its live demo to learn how it works. First I designed the webpage and then created a box. In that box I have made a display where the counting times can be seen. It has three buttons which are used to start the countdown, stop it and start the countdown again. If you know basic JavaScript you can easily understand. For beginners I have given full details explanation.
Step 1: Basic structure of stopwatch
We have created the basic structure of this stop watch using the following HTML and CSS codes. First I designed the web page with the help of CSS code.
Here I used the background color blue of the page. I have used box width 40% and minimum width 500 px. Border-radius: 10px is used to round the four corners of the box.
<div class="container">
</div>
*,
*:before,
*:after{
padding: 0;
margin: 0;
box-sizing: border-box;
}
body{
background: #448aff;
}
.container{
background-color: #ffffff;
width: 40%;
min-width: 500px;
position: absolute;
transform: translate(-50%,-50%);
top: 50%;
left: 50%;
padding: 20px 0;
padding-bottom: 50px;
border-radius: 10px;
}
Step 2: Create a display to see the time
I created a display in this box using these HTML and CSS codes. This display will help to see who is counting time. Here you can see the count of hours, minutes, seconds and milliseconds.
A shadow has been used around this display which has enhanced its beauty. Also using font-size: 40px here will increase the size of the time a bit.
<div class="timerDisplay">
00 : 00 : 00 : 000
</div>
.timerDisplay{
position: relative;
width: 92%;
background: #ffffff;
left: 4%;
padding: 40px 0;
font-family: 'Roboto mono',monospace;
color: #0381bb;
font-size: 40px;
display: flex;
align-items: center;
justify-content: space-around;
border-radius: 5px;
box-shadow: 0 0 20px rgba(0,139,253,0.25);
}
Step 3: Create 3 buttons in the JavaScript stopwatch
Now the following HTML and CSS codes have been used to create three buttons in the stopwatch.
Each button has a width of 120px and a height of 45px. I have used font-size: 18px to increase the size of the text in the button.
<div class="buttons">
<button id="pauseTimer">Pause</button>
<button id="startTimer">Start</button>
<button id="resetTimer">Reset</button>
</div>
.buttons{
width: 90%;
margin: 60px auto 0 auto;
display: flex;
justify-content: space-around;
}
.buttons button{
width: 120px;
height: 45px;
background-color: #205e94;
color: #ffffff;
border: none;
font-family: 'Poppins',sans-serif;
font-size: 18px;
border-radius: 5px;
cursor: pointer;
outline: none;
}
Using the css below, I set the background-color of the second and third buttons. Above we set the blue color for the background of the button but now using nth-last-child () I set different colors for the second and third buttons.
.buttons button:nth-last-child(2){
background-color: #d23332;
}
.buttons button:nth-last-child(1){
background-color: #20b380;
}
Step 4: Activate the stopwatch using JavaScript
Now is the time to activate this stopwatch using JavaScript. Above we have completed the complete design work using HTML and CSS. If you know basic JavaScript, you can easily understand your own JavaScript explanations.
I have determined the value of some information using the following three line code. First I set the value of hour, minute, second, millisecond to zero. This means that these values will be zero when the countdown starts. With set a constant of the display id.
let [milliseconds,seconds,minutes,hours] = [0,0,0,0];
let timerRef = document.querySelector('.timerDisplay');
let int = null;
Now I have executed the start button using JavaScript below. As a result, the countdown will start when you click on that button.
Under normal circumstances, the countdown value will be 0. The countdown will increase every millisecond when you click on it.
document.getElementById('startTimer').addEventListener('click', ()=>{
if(int!==null){
clearInterval(int);
}
int = setInterval(displayTimer,10);
});
I have implemented the pause button using these codes. The countdown will stop when you click on this button.
document.getElementById('pauseTimer').addEventListener('click', ()=>{
clearInterval(int);
});
I have implemented the reset button using the following codes. As a result, when you click on the reset button, the time in the display will return to the previous state, ie zero. When you click on this button, the value of hours, minutes, seconds, milliseconds will become zero.
document.getElementById('resetTimer').addEventListener('click', ()=>{
clearInterval(int);
[milliseconds,seconds,minutes,hours] = [0,0,0,0];
timerRef.innerHTML = '00 : 00 : 00 : 000 ';
});
Now I have used the 'if' function here to make the stopwatch work. I've tried to give a full explanation of how it works. I have used the 'if' function three times and using each function I have given a specific condition. First I set the time in milliseconds.
➤ When the value of milliseconds is equal to 1000, we will see zero in the millisecond cell and the number of seconds will increase by one. Because we all know 1000 milliseconds equals 1 second.
➤ I have given the condition that when the value of the second is 60, we will see zero in the second cell and one increment in the minute cell.
➤ The third time I used the 'if' function I executed the time in minutes. When the minute time reaches 60, you will see 0 in the minute cell and 1 in the hour cell.
This way you can run a countdown of many more pieces of information such as days, months, etc. by following the same rules.
function displayTimer(){
milliseconds+=10;
if(milliseconds == 1000){
milliseconds = 0;
seconds++;
if(seconds == 60){
seconds = 0;
minutes++;
if(minutes == 60){
minutes = 0;
hours++;
}
}
}
Now using the following four lines of JavaScript I have added one zero to the case of one number of times. When the value of the countdown time is less than ten, we add a zero.
Here we have given the condition when the value of hour, minute, second and millisecond is less than 10 then one zero is added to it. Then that time will be transmitted in h, m, s, ms. You can watch its live demo.
As you can see below I have used a little extra code in milliseconds. This is because milliseconds are made up of four numbers which means there are 3 zeros.
So in this case I have added the condition twice. The first time I used the condition, when the time value is less than 10, two zeros will be added. A zero will be added when the value of time is less than 100.
let h = hours < 10 ? "0" + hours : hours;
let m = minutes < 10 ? "0" + minutes : minutes;
let s = seconds < 10 ? "0" + seconds : seconds;
let ms = milliseconds < 10 ? "00" + milliseconds : milliseconds < 100 ? "0" + milliseconds : milliseconds;
As you can see above, we have stored all the time of the countdown in h m s ms.
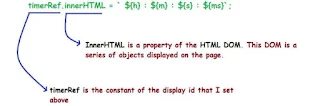
Now you have to sort all this information into the display using innerhtml. innerhtml helps to organize any information in the HTML page.
For your convenience I have given below a picture which will help you to know how the code below works.
timerRef.innerHTML = ` ${h} : ${m} : ${s} : ${ms}`;
Final javascript code
Below we have put together the complete JavaScript code for your convenience.
let [milliseconds,seconds,minutes,hours] = [0,0,0,0];
let timerRef = document.querySelector('.timerDisplay');
let int = null;
document.getElementById('startTimer').addEventListener('click', ()=>{
if(int!==null){
clearInterval(int);
}
int = setInterval(displayTimer,10);
});
document.getElementById('pauseTimer').addEventListener('click', ()=>{
clearInterval(int);
});
document.getElementById('resetTimer').addEventListener('click', ()=>{
clearInterval(int);
[milliseconds,seconds,minutes,hours] = [0,0,0,0];
timerRef.innerHTML = '00 : 00 : 00 : 000 ';
});
function displayTimer(){
milliseconds+=10;
if(milliseconds == 1000){
milliseconds = 0;
seconds++;
if(seconds == 60){
seconds = 0;
minutes++;
if(minutes == 60){
minutes = 0;
hours++;
}
}
}
let h = hours < 10 ? "0" + hours : hours;
let m = minutes < 10 ? "0" + minutes : minutes;
let s = seconds < 10 ? "0" + seconds : seconds;
let ms = milliseconds < 10 ? "00" + milliseconds : milliseconds < 100 ? "0" + milliseconds : milliseconds;
timerRef.innerHTML = ` ${h} : ${m} : ${s} : ${ms}`;
}
#viastudy


.gif)
0 Comments