
Every designated family technology enthusiast has had the call from Aunty Ethel asking for help with their PC, but what if they live too far away to realistically travel there? Fortunately, you can use a remote desktop connection to fix the computer from the comfort of your own chair.
Unfortunately, remote desktop connections don't always work how you want. Here are several tips on fixing remote desktop issues so you can continue your role as the family system admin, no matter where you are.
1. You Can't Connect to the Remote Computer
First, check your network settings. Do both computers have a network connection? It is always the easiest connection issue that sneaks under the radar!
If both computers have a network connection, you can move on. The Windows Remote Desktop Connection requires either an IP address or a name for the console you are attempting to view.
Make sure you have the correct IP address for the remote computer. On the remote computer, you can visit whatismyip and copy down the address. If you are not with the remote computer, you must ask someone at the location to do this for you, then send over the IP address.
Similarly, to find out the computer name of the remote device, head to Start Menu > Control Panel > System and view the computer name and workgroup.
2. Remote Connections Not Allowed
You might find that remote connections are disabled on the terminal you are trying to reach. You can alter this setting on the same System page as above. To the right of the computer name and workgroup, select Change Settings to open the System Properties menu. Select the Remote tab.
Windows 10 offers the same Remote Desktop Connection options as older Windows versions. Under Remote Desktop, there are two options:
- Allow remote connections to this computer
- Allow connections only from computers running Remote Desktop with Network Level Authentication (recommended)
Once you allow remote connections, you also have the option of only accepting remote connections using Network Level Authentication. As stated on
Microsoft Community, Network Level Authentication is "an authentication method that completes user authentication before you establish a full Remote Desktop connection and the logon screen appears."
It provides an additional layer of security from malicious software and users while using fewer resources in the process. However, if you struggle to create a remote desktop connection after switching Network Level Authentication on, try turning it off.
You can check if your version of Remote Desktop supports Network Level Authentication by clicking the top-left of the dialog box and select About.
3. Remote Desktop Connection for Windows 10 Home Using RDP Wrapper Library
Windows 10 Home users struggle with Remote Desktop. Why? Because Windows 10 Home doesn't support incoming connections. At least, not natively.
Windows 10 Home users can make an outgoing Remote Desktop connection to a different computer (not running Windows 10 Home!), but not vice versa. Thankfully, a simple, software-based fix works around the issue: the RDP Wrapper Library.
The RDP Wrapper Library uses the existing Windows Terminal Service and adds new Windows Firewall rules to remote desktop connections. The RDP Wrapper Library also provides an interface to manage remote desktop connections, as Windows 10 Home doesn't have an integrated solution.
Here's how you allow remote desktop connections on Windows 10 Home using RDP Wrapper Library:
- Head to the RDP Wrapper Library GitHub Releases page.
- Download the RDPWInst.zip file. After downloading, right-click the file and extract the archive to a new folder. For instance, using 7-Zip, I would select 7-Zip > Extract to RDPWrap-v1.6.2.
- Open the new folder, then run bat.
- After installation, run bat.
- Now, run exe to make sure the process is working.
- You can use exe to manage advanced configuration settings.
4. You Can't Copy Text From the Remote Computer
You can use Remote Desktop Connection to copy text from one terminal to your own. If the copy text feature isn't working, you need to enable the Clipboard redirect function to use it on the remote computer.
- Open the Remote Desktop Connection dialog box by typing remote in your Start menu search bar, then selecting the Best match.
- Select Show Options. Head to the Local Resources tab. Under Local devices and resources, put a check in the Clipboard box. The option should be turned on by default.
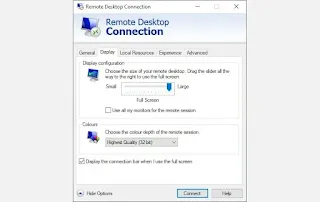
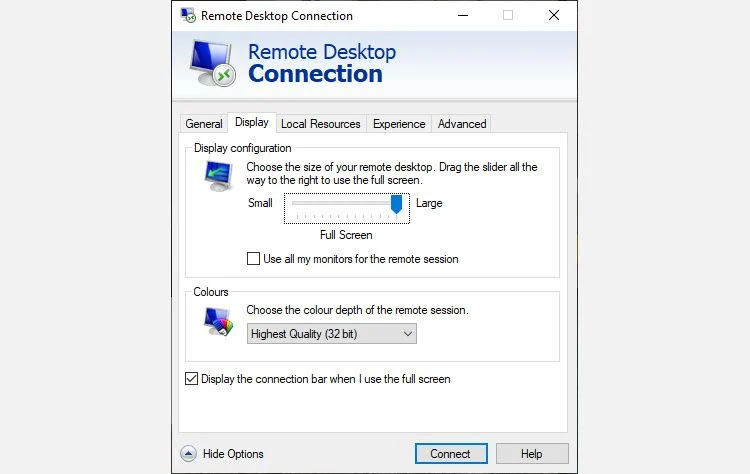
5. The Remote Window Isn't the Correct Size
Incorrect window size is another common Remote Desktop Connection issue. When you create the remote desktop connection, the window is too large, too small, or doesn't correlate to the settings you input.
You have two potential fixes here. First, you can force the Remote Desktop connection to use a specific size via the Run function. Hit Windows key + R, then input:
mstsc.exe /h:X /w:X
Where "X" is the height and width of the Remote Desktop viewing window you desire. Remote Desktop Connection will remember your settings for future remote viewing settings.
Second, the Remote Desktop Connection client has a handy screen resolution slider that scrolls from 640x480 up to Full Screen for your screen. Make sure to set the slider to Full Screen if you want a full-screen remote connection for each connection.
6. Delete Your Credentials to Reset Remote Desktop Connection Login
At times, Windows Remote Desktop Connection finds your login details confusing. There is also the chance the login details for your system or the remote system are different from your last remote connection. You can remove and replace your existing credentials to try and fix the issue.
- In the Remote Desktop Connection client, head to the Advanced tab.
- Select Settings, then make sure Automatically detect RD Gateway server settings is selected.
7. How to Save Your Remote Desktop Connection Custom Settings
If you regularly connect to several different servers or clients, saving a custom configuration for each Remote Desktop will save time in the future. You can set the optimum width, height, and color settings for each server or terminal.
- Open the Remote Desktop Connection dialog, then select Show Options.
- You will now see the Connection settings options. Select Save As, specify your save location, then select Save to create a custom Remote Desktop Connection file (.RDP). Save it to a memorable location because you're going to need it instantly.
- Now, browse to the Remote Desktop Connection configuration file. You can edit the configuration file using a text editor, such as Notepad or Notepad++. Right-click the configuration file and select Open with, then select your text editor.
The first four lines show your remote connection screen size options (plus whether multi-monitor mode is available). You can edit the screen mode to set whether the remote window session appears full screen. For instance, id:i:2 sets full-screen, whereas id:i:1 sets the remote connection to appear in a window.
If you set the screen mode to "2" for full screen, the desktopwidth and desktopheight values automatically match the screen size of the host client. However, if you are using screen mode "1," you can use the desktopwidth and desktopheight settings to set a specific window size.
After you confirm your settings, add the following string to the end of the file:
smart sizing:i:1
Smart sizing allows you to dynamically alter your screen settings without messing around with configuration files while the Remote Desktop connection is active. However, you must add the string for each custom configuration you create.
8. Handy Remote Desktop Connection Shortcuts
You can boost your Remote Desktop Connection productivity using a handful of keyboard shortcuts. These shortcuts are designed to work when you access Remote Desktop using the Run dialog.
Start Remote Desktop in full-screen mode: mstsc /f
Start Remote Desktop in Admin Mode: mstsc /admin
Matches your Remote Desktop session with the local virtual desktop: mstsc /span
Matches your Remote Desktop session to the Client Layout: mstsc /multimon
Open the .RDP file for editing---change "connection file" to your file name before running the command: mstsc /edit "connection file"
You can use the following Remote Desktop shortcuts once your Remote Desktop connection is live:
Switches your Remote Desktop client between full-screen and windowed mode: Ctrl + Alt + Pause
Force the Remote Desktop into full-screen mode: Ctrl + Alt + Break
Takes a screenshot of the active Remote Desktop window: Ctrl + Alt + Minus
Takes a screenshot of the entire Remote Desktop: Ctrl + Alt + Plus
Reboots the remote computer: Ctrl + Alt + End


.gif)
)
0 Comments